
Most houses do not get into trouble overnight. Problems start quietly, with a small leak at a roof joint, a bit of water sneaking in around a window, or a damp line along a basement wall after a heavy rain. At first, there may be no stain, no smell and nothing that signals real danger. However, with early detection, homeowners can take proactive steps to prevent these issues from escalating. Meanwhile, the building materials are staying wetter than they should, heat is escaping from the house, and conditions are setting up for mould to grow where no one can see it.
Modern home inspections are about finding hidden issues before they become an expensive surprise. Experience and a trained eye still matter, but today we also have tools that can help us look beneath the surface. Thermal imaging cameras and moisture meters, our trusted companions, provide a clearer picture of how a home behaves day-to-day. Used together, they help answer two simple but essential questions:
Is there unwanted moisture in this home, and has it been there long enough to cause mould or damage?
This article explains how moisture and mould are connected, how thermal imaging works, what those purple and orange pictures are really telling you, and why basements, foundations, windows and roof flashing deserve extra attention in Kingston and area homes.
Moisture, mould and why they matter
Mould is a living organism. It grows wherever it can find three basic things: moisture, a food source such as wood, paper, drywall or fabric, and time. Once mould starts growing, it can stain surfaces, weaken materials, and significantly affect indoor air quality; this is a concern that all homeowners, especially those with asthma, allergies, or other respiratory problems, should be mindful of. Still, mould is not something anyone wants to live with, especially when it spreads through walls or ceilings rather than confined to a small patch in a bathroom.
Visible mould at the base of a wall indicates that moisture has been present for an extended period, not just from a one-time spill.
It’s important to understand that mould is not just a surface problem. Public health guidance in Canada treats indoor mould as a sign of excess moisture in the home. The advice is straightforward: clean up visible mould safely and deal with the moisture that allowed it to grow in the first place. If you do not address the moisture, the mould will almost always return, no matter how many times it is cleaned or painted. This underscores the importance of addressing the root cause of mould: excess moisture.
Understanding that the starting point is not the mould itself but the water that feeds it is crucial. Roof leaks, dripping pipes, seepage at the base of a foundation, humid indoor air that condenses on cold surfaces, and poorly sealed windows and doors can all keep building materials wetter than they were designed to be. A thorough inspection focuses on identifying moisture sources and assessing how long they have been active, as early detection can prevent mould growth.
Further Reading: https://www.canada.ca/en/health-canada/services/publications/healthy-living/addressing-moisture-mould-your-home.html
How water sneaks into a house
Water has patience. It will follow the most straightforward path it can find, and it will do so every time it rains or every time you shower or cook. Over weeks and months, small pathways can cause real damage. Some of the most common entry points are worth highlighting.
On the roof, problems often begin at joints and transitions rather than in the shingle field. Flashing around chimneys, skylights, roof vents, and roof-to-wall intersections is meant to catch water and direct it back onto the roof surface. If that flashing is missing, too short, nailed in the wrong place or sealed with aging caulk instead of properly lapped metal, water can slide sideways into the roof deck and down into the walls. The damage may stay hidden in the attic or behind drywall for a long time before a stain appears on an interior ceiling.
Around windows and doors, water is meant to hit the exterior cladding, run down and be thrown clear by a drip edge or flashing. When windows are installed without proper flashing, or when sealant fails and is not replaced, water can run into the wall instead. It can collect on the top of a window, soak the framing or track down beside the opening and show up as a stain at the baseboard months later. Sometimes it never becomes visible at all, but quietly feeds mould inside the wall cavity.
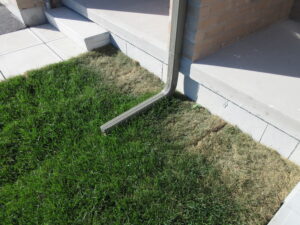
Downspouts that drain beside the wall rather than several feet away can keep the soil at the foundation wet, leading to basement moisture problems.
Basements and foundations are a special concern in this region. Kingston and the surrounding townships have a high water table and a mix of older homes and newer construction. In older basements, you may see moisture coming through stone or block walls, especially where the exterior grade slopes toward the house or where downspouts discharge beside the foundation. Even newer foundations can leak at tie holes, cracks or poorly sealed joints. A narrow gap in a floor slab can become a regular entry point whenever the surrounding soil is saturated.

Long-term water staining on a basement floor shows how moisture can keep concrete damp, encouraging mould and deterioration.
Inside the home, plumbing leaks, overflows, and even everyday activities can add moisture. Hot showers without an exhaust fan running, cooking without a range hood, or venting a dryer indoors can all raise humidity. When that humid air hits cold surfaces such as single-pane windows, poorly insulated exterior walls, or steel structural members, moisture can condense from the air and remain on the surface long enough to support mould growth.
Thermal imaging and what those colours really mean
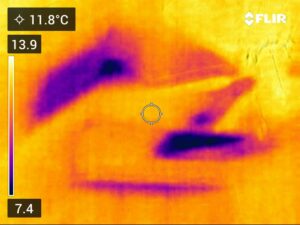
Thermal imaging is an efficient tool in home inspections. The differing colours on the camera screen are where thermal imaging becomes particularly useful. A thermal camera detects infrared radiation emitted by all objects and converts it into a colour image. The purple and dark blue areas are cooler, while the yellows and oranges are warmer. These temperature differences are of interest, as they can indicate insulation issues and moisture intrusion.
If a wall is well insulated and dry, the surface temperature is pretty even. When insulation is missing, compressed or displaced by wind washing in the attic, the framing or certain sections can appear cooler. You might see vertical stripes that indicate the studs, or horizontal bands where insulation is thin or missing. In winter, those spots often correspond to areas where a room feels drafty or where occupants complain that a particular wall or corner is always cold.
The same principle helps with moisture. Water alters how heat moves through a material. A damp section of drywall or sheathing will often register as cooler than the surrounding dry area, especially when there is a temperature difference between indoors and outdoors. A small roof leak at a valley, for example, might show as a cool patch that extends down from the joint long before a brown ceiling stain appears. Around windows, a thermal image might reveal a distinct cold outline beneath the sill or along one side, indicating that water has found a path inside or that cold air is leaking around the frame.
Thermal imaging, by itself, does not say “this is mould” or “this is definitely water.” It indicates that a part of the building is behaving differently from the rest. That difference is a flag for the inspector to look more closely, take measurements, and, if necessary, recommend further investigation.
Moisture meters and confirming what the camera sees
Because a thermal image alone can be misleading, a careful inspector always corroborates the images with direct readings, where moisture meters come in. The photo of the meter pressed into a crack in the wall shows how we move from “this looks cool in the image” to “this material is actually damp.”
Moisture meters work in several ways. Some measure the electrical resistance of the material between two pins, which changes with water content. Others use a pad on the surface to read moisture levels a short distance below the finish. During an inspection, the meter is used on both suspicious areas and known dry reference points to provide context for the numbers.
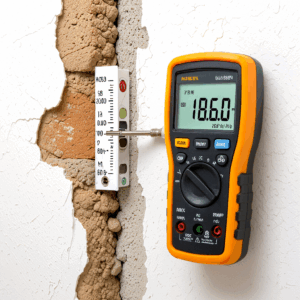
Moisture meters confirm whether suspicious areas are actually damp, not just cold or discoloured.
For example, if a thermal image shows an anomalous band at the base of a basement wall, the inspector might take readings in that band, then slightly higher up, and on another wall that does not show the same pattern. Suppose the readings are significantly higher in the cool band, indicating active moisture seepage. If the readings are similar everywhere, the temperature difference may be due to a draft or a construction difference rather than water.
Used this way, the camera and the meter work together. The camera is a wide lens that shows where to pay attention. The meter is the close-up tool that confirms which of those areas are really wet. Both sets of information are included in the report so that homeowners and contractors can see not only what was found but also how the conclusion was reached.
Heat loss, comfort and the risk of condensation
Heat loss is not only a comfort and energy issue. It also contributes to mould growth. When parts of the building envelope are colder than they should be, moisture in the indoor air can condense on those surfaces. Over time, that moisture can support mould even without any leaks.
In Kingston winters, you may see this as water droplets on window glass, black mould at the corners of window frames, or damp patches on outside walls behind furniture. Thermal imaging can reveal cold spots. Often, they align with missing insulation, poorly sealed penetrations, or structural elements that bridge from the inside to the outside without sufficient insulation in between.
Thermal imaging can reveal heat loss and insulation problems in a ceiling, even when there is no attic access.
An inspection that combines thermal imaging with a review of insulation levels, ventilation and humidity helps homeowners understand which upgrades will give them the best return. Sometimes that means topping up attic insulation, improving air sealing around rim joists and penetrations, or upgrading old windows. Sometimes it means better controlling indoor humidity with exhaust fans and a basement dehumidifier so that surfaces do not reach the dew point.
Windows, flashing and the building envelope
Windows and roof flashing deserve special mention because they sit at the boundary between weather and structure. When a window is installed with proper flashing, water that seeps behind the exterior cladding is collected and returned to the exterior. When flashing is missing or incorrectly installed, water can go where it was never meant to.
In practice, an inspector might see a subtle sag in a sill, a cracked bead of caulking or a small stain at the corner of a trim board. A thermal scan could show a blue streak (Cool) just below that point. Moisture readings might confirm that the framing or drywall in that area is damp. Put together, those clues tell a story: water has been entering at that joint, often enough to change the wall’s temperature and moisture profile.
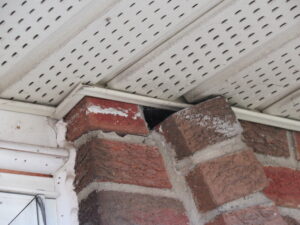
Gaps and missing flashing where brick meets the soffit can let water into the wall long before any stains show indoors.
Roof-to-wall junctions behave similarly. The third thermal image you supplied, with a cool patch where a roof slopes into a wall, is a classic example of a place where flashing must work hard. If that patch matches up with moisture readings or visible staining inside the house, it is a strong signal that the flashing needs to be repaired or replaced before more significant damage occurs.
Where mould fits into the picture
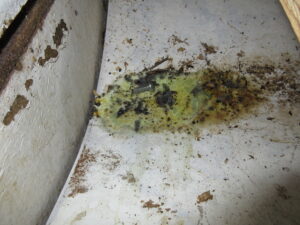
By the time mould is visible, moisture has usually been present for some time. The final photo you shared, showing staining and fungal growth at the base of the wall and cabinet, illustrates what can happen when a small leak or seep is left unaddressed. At that stage, an inspection is not just about finding moisture. It is also about understanding the scale of the mould problem and determining the appropriate response level.
Small patches of mould on non-porous surfaces may be manageable for a homeowner who follows health authority guidance and uses proper protection. Larger areas on drywall, framing or insulation usually require professional remediation. The key is to avoid disturbing large amounts of mould without containment, as this can spread spores throughout the home.
Air or surface testing for mould can be helpful in some situations, especially when there is a strong smell but no visible source, or when reports are needed for a real estate transaction or dispute. Testing on its own, however, is not the main answer. The more important step is to find and correct the moisture source that allowed the mould to grow.
What a moisture and mould-focused inspection provides
A good inspection brings all of these threads together. It begins with a conversation about the home’s history, any past leaks, renovations, and concerns. It continues with a careful look at the exterior, the interior and the areas where moisture is most likely to appear. Thermal imaging and moisture meters are used where they will add value, not as stand-alone gimmicks, and the findings are explained in plain language.
By the end of the process, you should have a clear sense of where moisture is entering, how far it has travelled, whether mould is likely to be present, and what the realistic next steps are. Sometimes the answer is as simple as redirecting downspouts, adding a fan or sealing a known gap. In other cases, it may involve roof repairs, window replacement, drainage work or professional remediation.
The goal is always the same: to help you make informed decisions about your home, whether you are buying it, selling it or trying to keep it in good shape for the long term. Thermal imaging, moisture testing, and a solid understanding of how houses behave give you an honest picture of what is happening behind the walls, so minor problems do not have a chance to become big ones.
Frequently asked questions
Do I always need a mould test if I can already see mould?
Not usually. If mould is visible, you already know there is a moisture problem that needs to be corrected, along with material that needs to be cleaned or removed. Testing can be helpful in some obvious cases, such as when there is a strong odour but no visible source, or when written lab results are needed for a report. Most of the time, money is better spent on addressing moisture and repairing damage.
Can thermal imaging find every leak or moisture problem?
Thermal imaging is a powerful tool, but it is not magic. It works best when there is a difference between indoor and outdoor temperatures and when the leak has been active long enough to affect the surface temperature. Very small or recent leaks may not appear immediately. That is why thermal images are always combined with moisture readings, visual inspection and, sometimes, follow-up visits.
Is thermal imaging included in every inspection, or is it an optional add-on?
For many homes, thermal imaging is now a routine part of the inspection. In some cases, it is included; in others, it may be offered as an add-on when there are particular concerns about moisture, insulation, or comfort. If you are booking an inspection and are unsure, it is always worth asking whether thermal imaging will be used and which parts of the home it will cover.
If mould is found, does that mean the house is unsafe?
Finding mould does not automatically mean a home is unsafe to live in, but it does mean there is work to do. The size of the affected area, the materials involved and the health of the people in the home all play a role in deciding how urgent the situation is. An inspection can help you understand whether you are dealing with a small, local problem or a larger issue that needs professional remediation.
How often should I check my home for moisture issues?
Most homeowners do well with a simple seasonal routine. A quick check in the spring and fall for roof leaks, damp basement areas, window condensation and musty smells can catch many issues early. Any time you notice a new stain, a change in odour, or a leak after a storm, it is worth paying attention and, if needed, calling for an inspection rather than waiting to see if it worsens.
Can a home that has had moisture or mould problems still be a good purchase?
Yes, as long as the problems are correctly understood and corrected. Many older homes in our area have had some history of moisture, especially in basements and around windows. What matters is whether the cause was identified, the repairs were done correctly, and the home is now performing well. A thorough inspection gives you a clearer picture so you can decide with your eyes open.
Further reading
These are topics I will be covering in future articles to help homeowners dig deeper into the issues raised here:
Basement moisture and finished spaces. How to finish or refinish a basement in a way that respects how concrete, insulation and vapour barriers behave in our climate.
Attic insulation and ventilation in Eastern Ontario. What a healthy attic looks like, how to recognize trouble and which upgrades offer the best value.
Understanding your home inspection report. A practical guide to reading the photos, comments and recommendations so you can turn a thick report into a clear action plan.
Windows, doors and comfort. How modern windows, proper flashing and simple air sealing can improve comfort and reduce condensation risks around openings.
Planning repairs after an inspection. Tips on what to tackle first, how to talk to contractors and how to use your report as a roadmap rather than a to-do list you dread.